This post is under construction*
Beanstorm
Espresso machine conversion incorporating pressure and temperature control via a native IOS app over BLE. Realtime control in C++, native IOS app in Swift/SwiftUI.
Introduction
The Goal
For a while now, a number of existing and new espresso machines have been
offering features to enable precise control of pressure/flow, temperature,
profiles and graph; in real-time, shot characteristics. These features are
increasingly becoming desired and expected in the specialty coffee scene. The
Decent DE1, Meticulous and Gaggiuino have all served as significant inspiration
to the project. All of which facilitate pressure profiles, real-time graphing,
and temperature control.
Starting Point
The starting point for the project is an unmodified Rancillio Silvia from 2012, a clean slate to work from. The Rancillio Silvia is essentially a glorified kettle, and that's why it's great. All the mechanical components to build a great, capable espresso machine, without the software. The Silvia has no digital control electronics, using thermal fuses for temperature control and a switch wired directly to the vibratory pump to get the shot started. Vibratory pumps are really effective for the size, they are also quite cheap but tend to be quite loud. Both the Decent DE1 and Gaggiuino projects achieve pressure control using vibratory pumps. For the Gaggiuino an in-line pressure transducer is used to create the pressure control loop.
Mechanics
In order to achieve a much quieter sound when the machine is pulling a shot, the vibratory pump has been switched out for the Fluid OTech GA072. This is a DC rotary vane pump that is used in lager, commercial, multi group-head espresso machines and really has no place in a home machine like the Silvia. Nevertheless, I managed to pick one up on eBay for about £80.00, and so I thought I would give it a shot. This introduced a number of challenges, both from an electronics standpoint (i.e. how can I power and control a 24V DC motor in a small UK mains powered espresso machine) and also from a plumbing perspective. These pumps are powerful, providing a flow-rate far too high for conventional espresso.
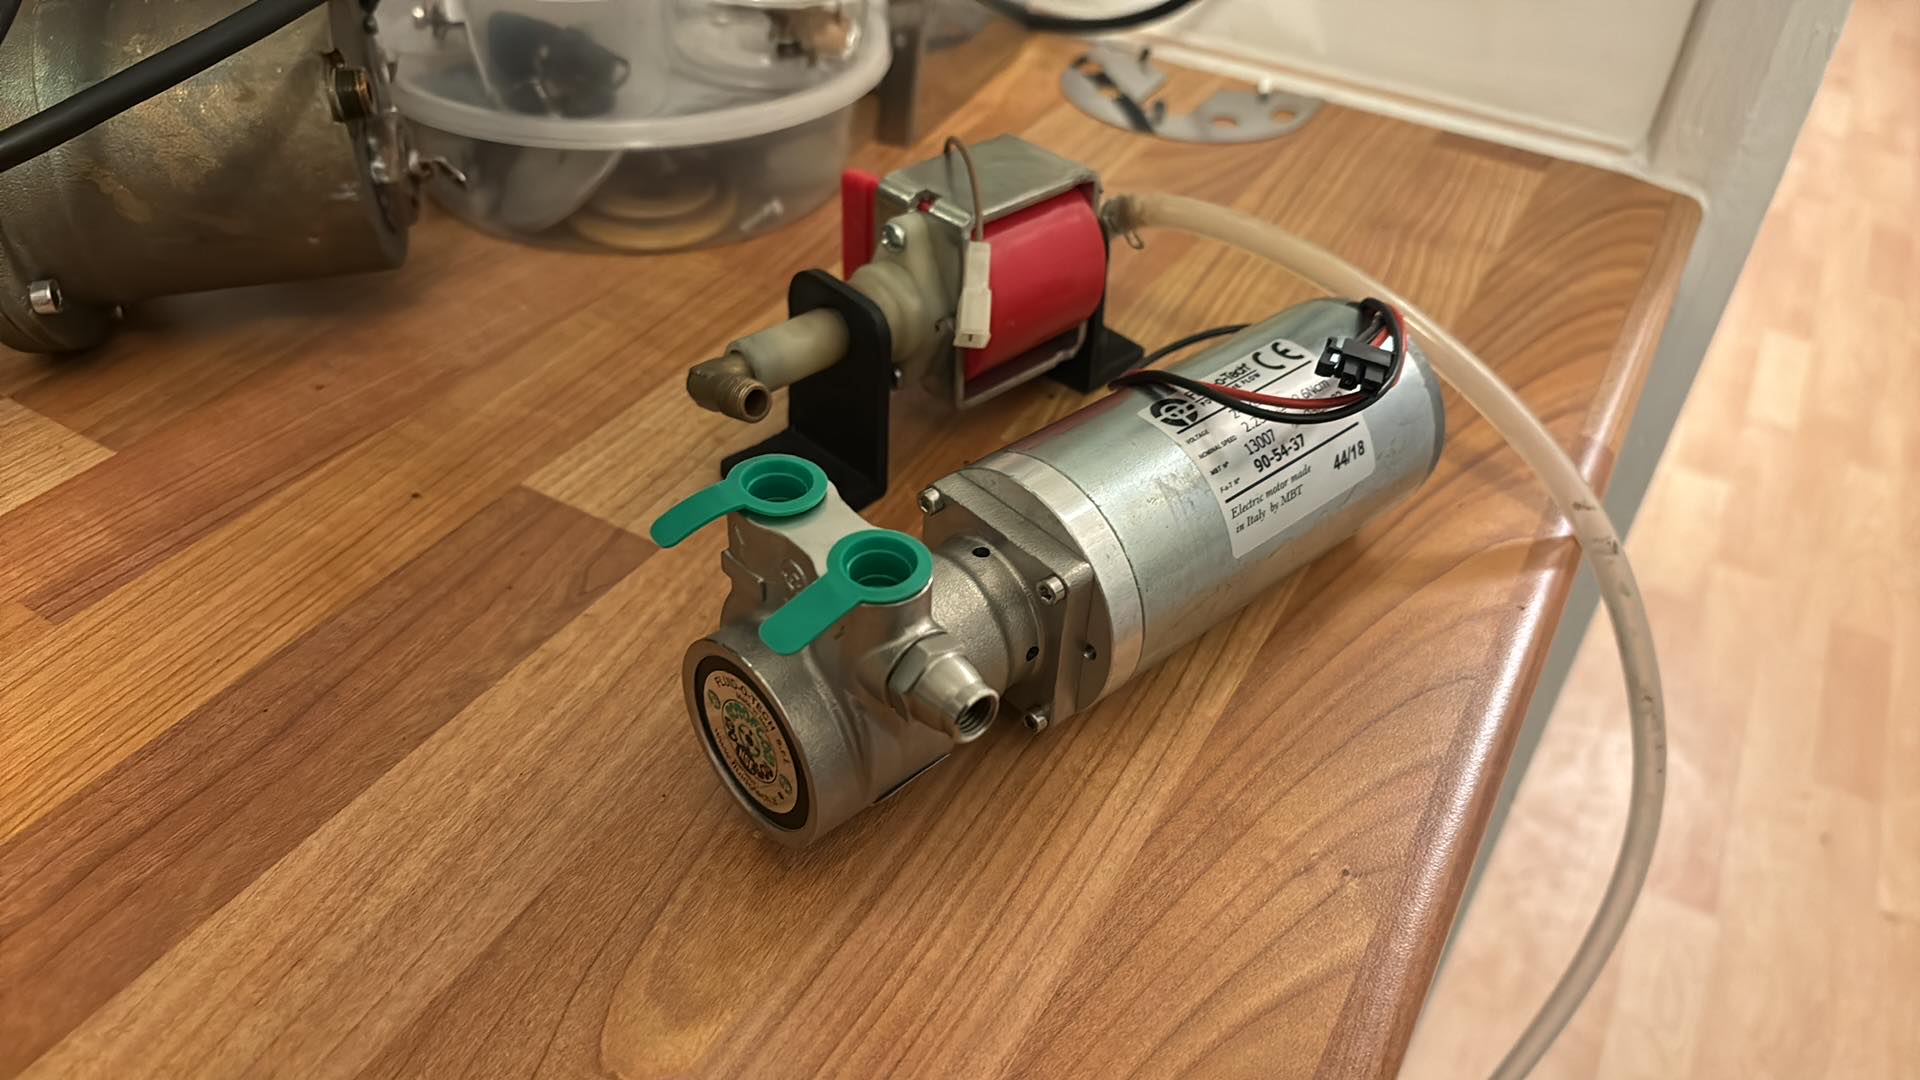
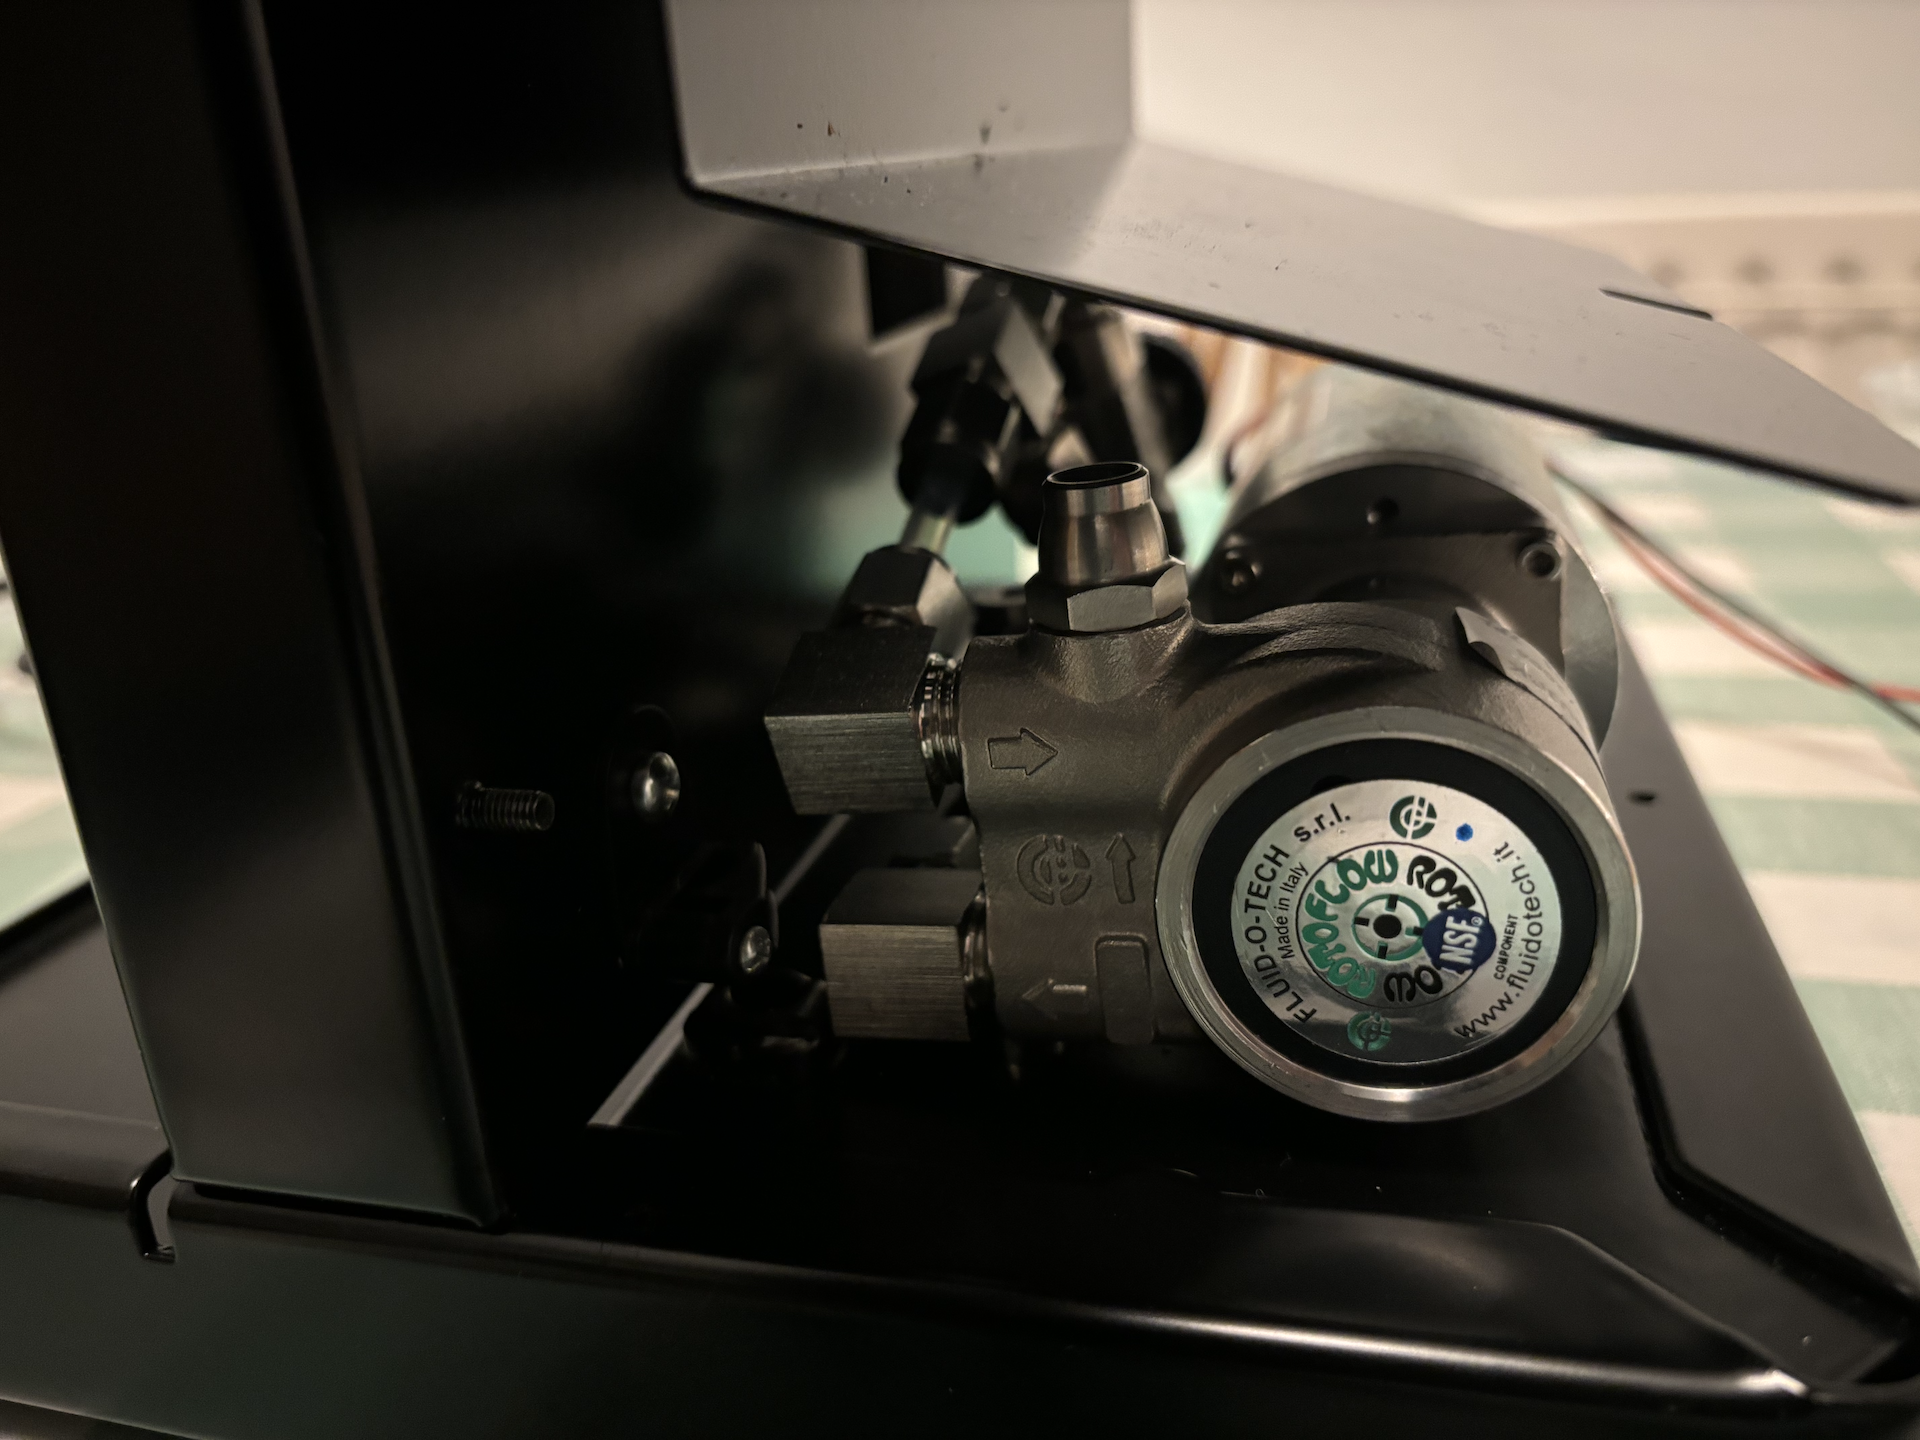
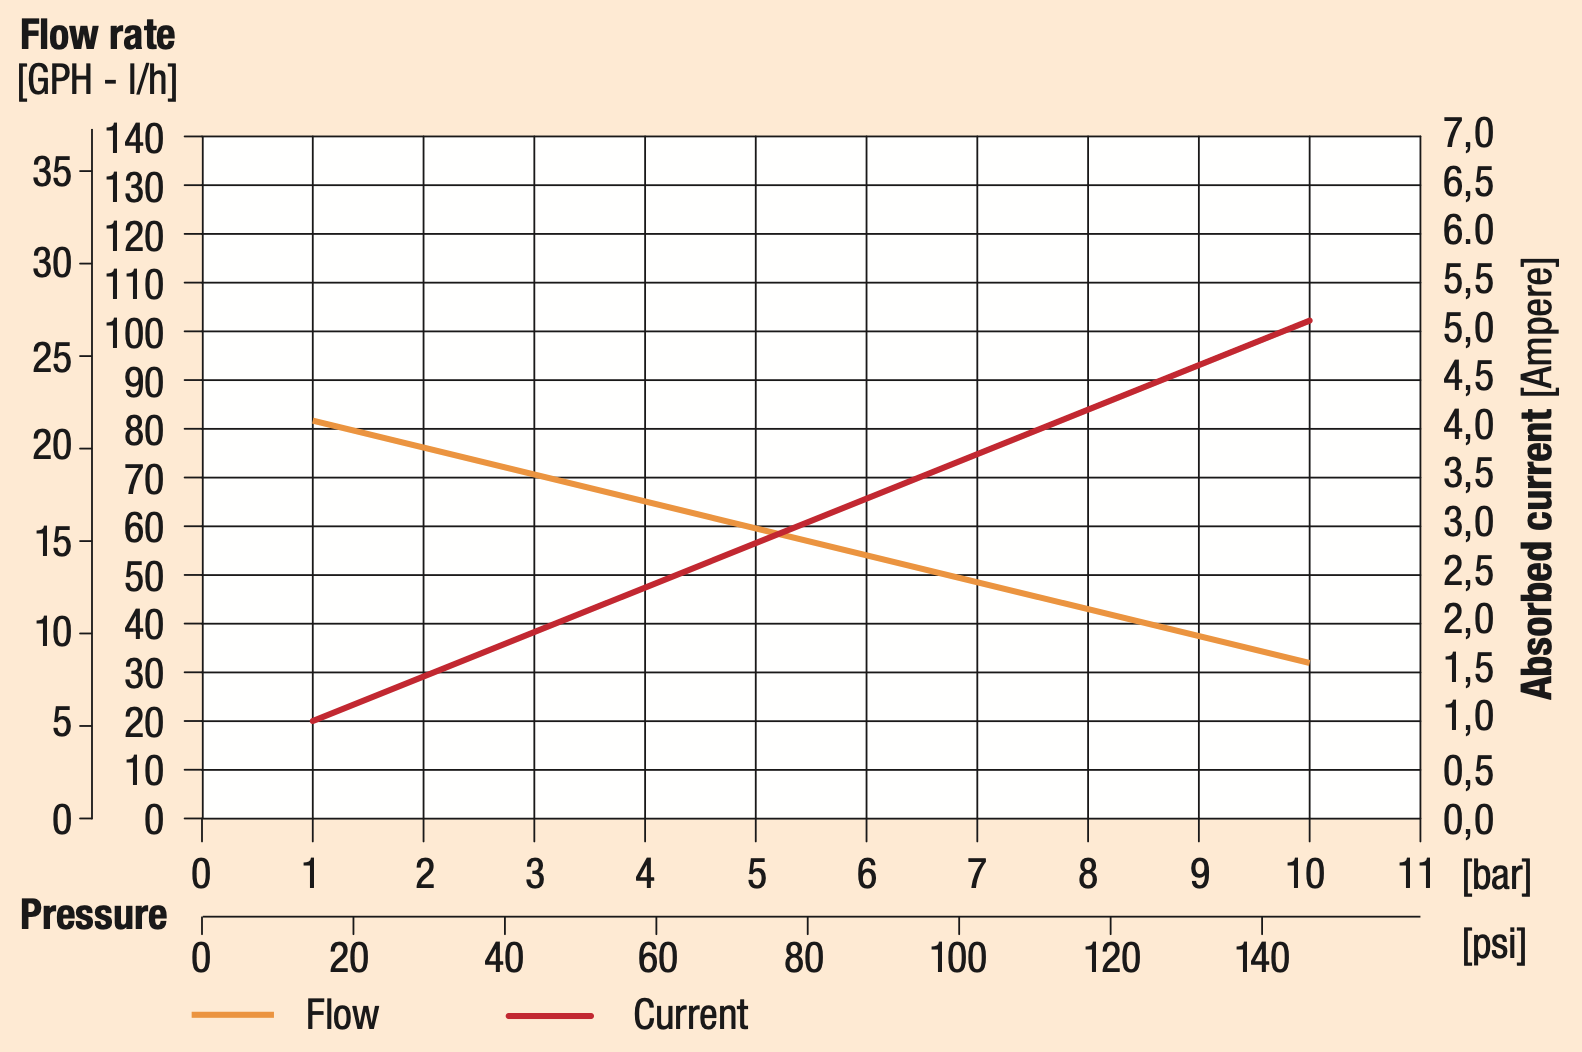
To overcome the issue of flow rate, a bypass circuit is needed to essentially drop the flow rate such that you have control for a range of RPMs. I found these two threads super useful and explain in more detail the problems with controlling flow/pressure with rotary vane pumps, convert-to-rotary-pump, pressure-profiling-with-fluid-o-tech.
These threads suggested drilling the regulator valve in the pump to create the bypass (this sounded scary and I don't have access to a milling machine to get through the steel valve). However, I have used an external bypass circuit across the inlet and outlet of the pump with a variable needle valve in between that allows me to tune the flow rate to the effective RPM range of the pump. I havexw manually tunes the machine using the valve, however I would consider graphing pressure against pump RPM with a blanking disk in place to tune this more accurately.
Electronics
Please do not rely on any of this build information, dealing with mains power can be very dangerous, this post is in no way intended as advice.
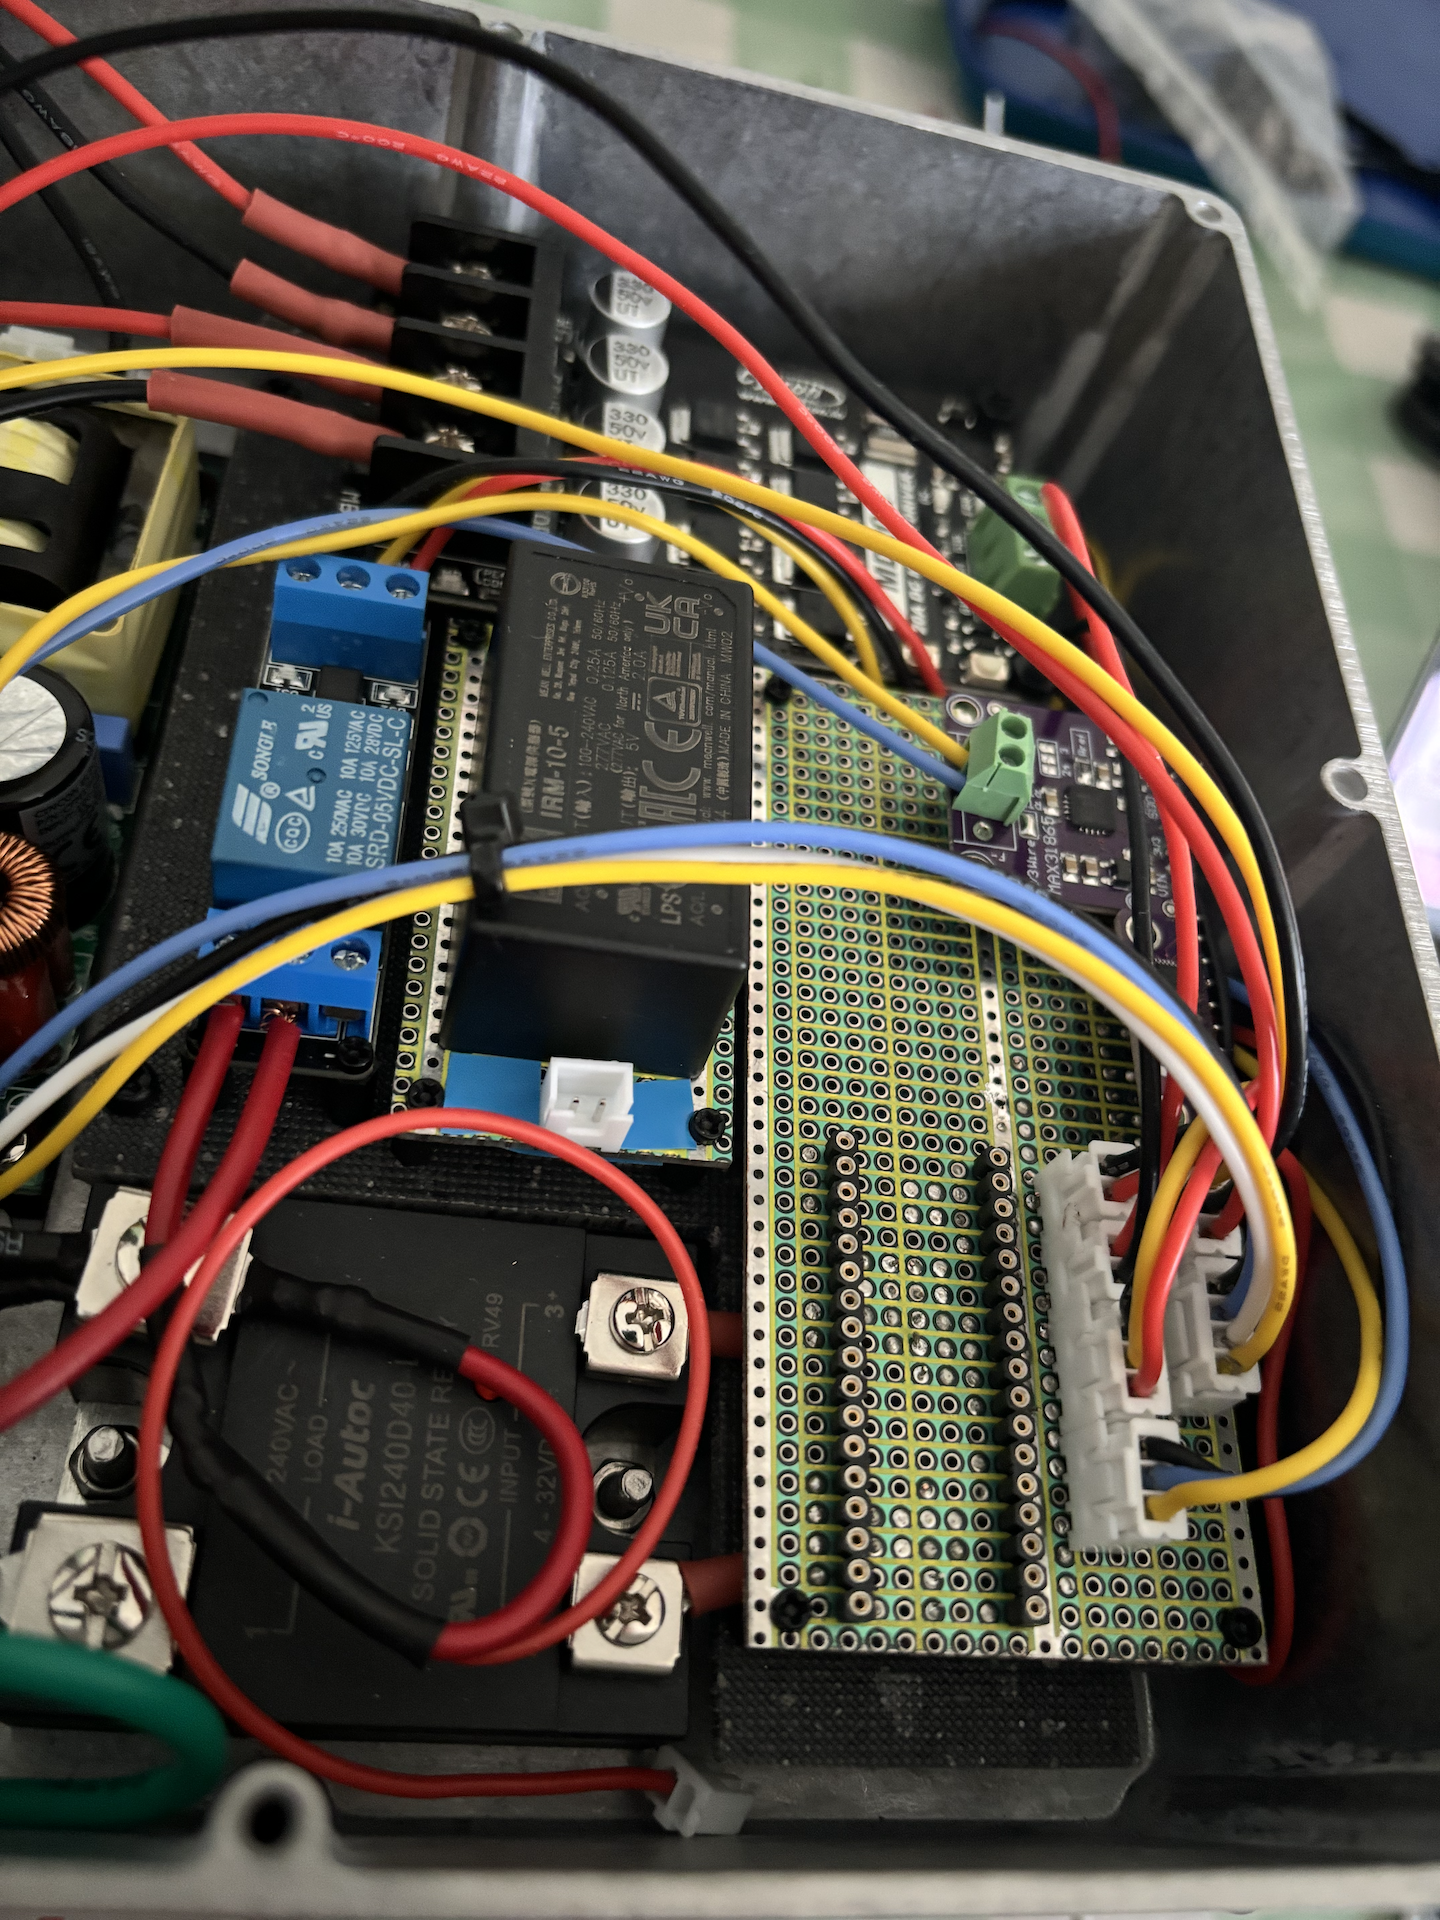
This espresso mod removes entirely all original wiring of the machine to build a new custom harness incorporating a hefty 240VAC - 24VDC converter, DC motor speed controller, 40A SSR for temperature control of the boiler and mechanical relay for switching the 3-way-valve in the group head. Alongside this, the machine is controlled with an ESP32 S3 microcontroller an inline pressure transducer (for pressure control) and thermocouple, connected to the boiler (for temperature control).
- Motor power supply
- Motor speed controller
- SSR
- ESP32 S3
- Temperature sensor
- Pressure sensor
Software
Beanstorm is built around two key projects: the Beanstorm OS and the Beanstorm App.
The Beanstorm OS is developed in C++ to run on the ESP32 S3 microcontroller, where it manages the essential functions of the machine. For example, taking sensor readings, controlling the heating element, managing the pump, and operating a three-way solenoid valve. The OS provides an API over Bluetooth Low Energy (BLE), making various machine values and controls accessible. It also allows the saving, loading and execution of different pressure profiles that can be designed using the app.
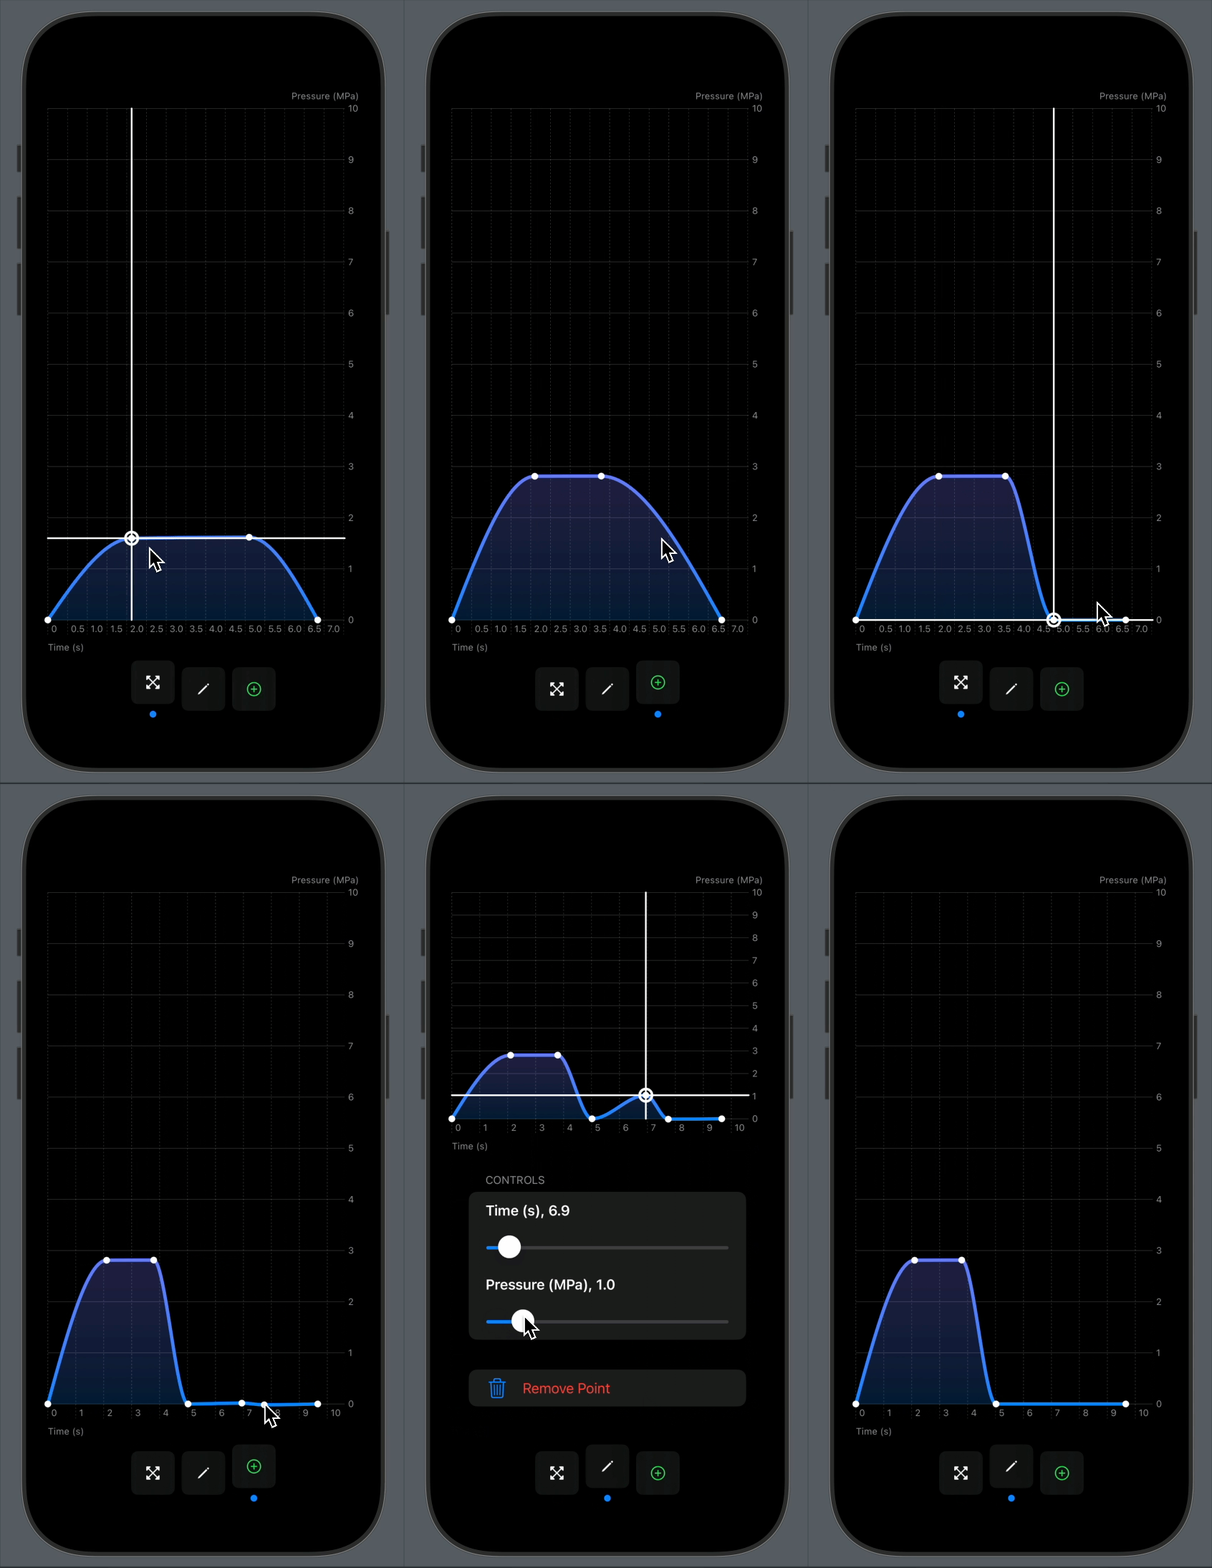
The Beanstorm App is a native iOS application developed in Swift UI, designed to interface with the OS via BLE using Protobuf for data serialisation/de-serialisation. The app enables users to initiate shots and provides real-time graphic of pressure and temperature data. It also includes an interactive curve editor, allowing the user to design, save, and modify pressure profiles, which can then be transferred to the machine. The app also allows controlling a number of different machine settings for example heater PID coefficients.
OS
Beanstorm OS makes use of Free RTOS largely to separate concerns between communications via BLE and the actual control of the machine. On startup, the BLE service responsible for providing the API to interact with the app via BLE is pinned to a separate core to the control logic. Communications are then made via immutable, thread safe queues. The event bridge, responsible for sending commands from the BLE service to the control service, and the notification queue, which the control service can use to notify the BLE Service of changes for example a shot starting (via a physical switch on the machine) or sensor readings. The thinking behind this architecture was largely to separate the interface for how the machine is communicated with vs how the machine is being run. Take for example, the ESP32 supports WIFI so possibly at some point in time, it would be good to support a user interface running using web technologies, or possibly an embedded screen. On reflection, I could/should? have used the event bridge for the switches on the machine.
The control side of the 'OS' has a few main responsibilities, reading and
interacting with different physical peripherals, running different programs
(modes), maintaining some form of machine state, controlling temperature and
executing pressure profiles. Peripherals are structured such that only a simple
API is provided to the caller (without the need to understand the underlying
mechanism), for example the temperature sensor provides a ReadTemperature call
returning the current temperature. I found this structure particularly helped
simplify the more complicated control logic in profiles. Temperature control is
achieved using PID, switching the SSR of the boiler with windowing. Similarly,
pressure control is achieved with PID, however this is controlling a variable
speed motor in the pump, with a relationship between RPM and pressure (this was
much more sensitive in tuning, and is much more susceptible to oscillations).
The control logic provides a loop that performs common tasks for example, sensor
readings, health check, probing the event bridge. However, the state is built
using a state machine, with different programs that can be entered and exited
and hook into the common loop. The idea behind this was in order to provide a
number of different modes, idle, brewing, steaming (needs to get hotter for
steaming milk and not run the pump), cleaning cycles and provide logical
separation between how each of these behave.
For communication with the app, the machine provides a BLE API with a service
containing a number of readonly characteristics for simple data such as pressure
and temperature readings, but also more complex characteristics for example, the
shot control characteristic which can start pulling a shot and communicate if a
shot is running. Additionally, pressure profiles are also transferred via a
characteristic, the BrewTransferCharacteristic, however due to limitations
placed by BLE in the data size of single characteristics, being a maximum
characteristic length of 512 bytes, transferring profiles, with variable length
names, number of control points required implementing a custom protocol around
characteristics to chunk the larger data and re-build at each end. This is a
relatively common approach for OTA upgrades on some devices. Though it has been
a great experience learning more about BLE, I did find it to be quite limiting
in some respects, WIFI would have been considerably simpler, however that would
have either required the device to connect to the machine and loose internet
access or the machine to connect to the local WIFI and be an exposed device. Two
choices were made however that I believe probably simplified the process, first
NimBLE, an open source BLE library has been used in order to interact with
higher level concepts of BLE such as services and characteristics, providing a
nice interface to define characteristics with callbacks, and interact with
notifications and subscriptions to different data. Protobuf has also been used,
with NanoPB (C library) allowing a single schema defining the data format of
each characteristic that can then also be consumed in Swift without worrying
about different endianness or data size, and also help catch errors when
serialising and de-serialising more complicated data structures.
TLDR
- Architecture
- Free RTOS (Threading)
- Event Bridge
- Control
- The loop
- Peripherals
- Controlling Temp
- Programs
- Data
- BLE / NimBLE
- Protobuf
- Interpreting Profiles
App
The beanstorm app is built using modern SwiftUI and communicates with Beanstorm OS via BLE using protobuf for message serialisation and de-serialisation. Having not worked with SwiftUI much prior to this, there was a bit of a learning curve, however I was really impressed by how quickly it was possible to achieve a fast native experience with animation and consistent styling. SwiftUI felt to me quite opinionated, but the defaults work very well and range of components including gauges, sliders and charts are all available.
One of the first challenges I encountered was managing state and maintaining a
separation between views, data and logic. This was further complicated by the
SwiftUI Previews feature that enables live previewing of components. SwiftUI
provides ObservableObjects that enable variables to be attributed
@Published, which allow the UI to respond to any changes in state for these
variables. I suppose one could think of this as similar to the useState hook
in React. The published attribute can't be used in protocols which makes using
them in previews slightly difficult. I suppose there are a few solutions to
this, one being prop drilling (passing simple data through the component tree).
I instead opted for using CurrentValueSubject in service protocols which
models could then subscribe to as they need. This allows for constructing models
in previews using a mock service.
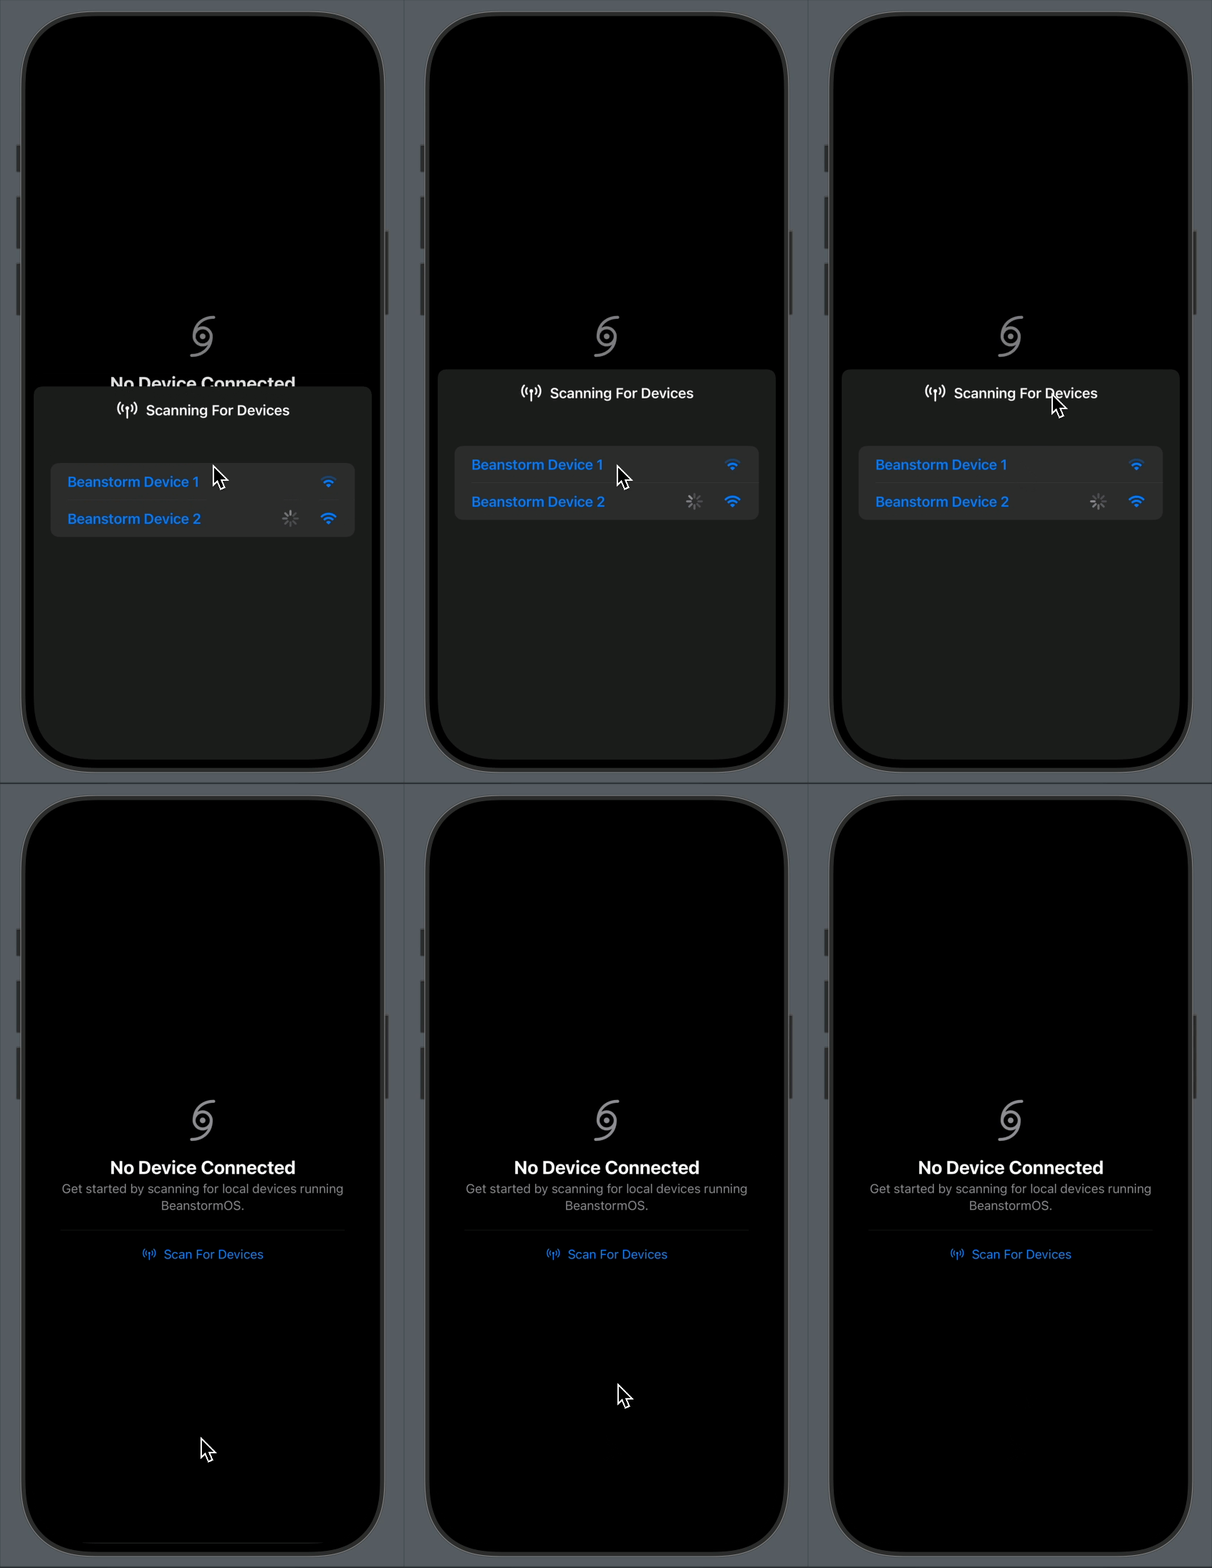
To interact with the different services exposed by the machine via BLE, I used Apple's CoreBluetooth framework, and SwiftProtobuf for interpreting and sending messages. I initiate a scan for devices containing the relevant services, display a list of available Beanstorm devices and then create a peripheral for the device the user selects. This populates a subject that the rest of the app can interact with. If the device disconnects for some reason (e.g. going out of range), the subject is cleared, allowing components to respond accordingly. The peripheral class subscribes to relevant BLE characteristics provided by the machine and exposes a number of subjects pertaining to properties such as temperature and pressure and also provides methods handle the interaction of larger data, for example sending profiles over to the machine or modifying settings.
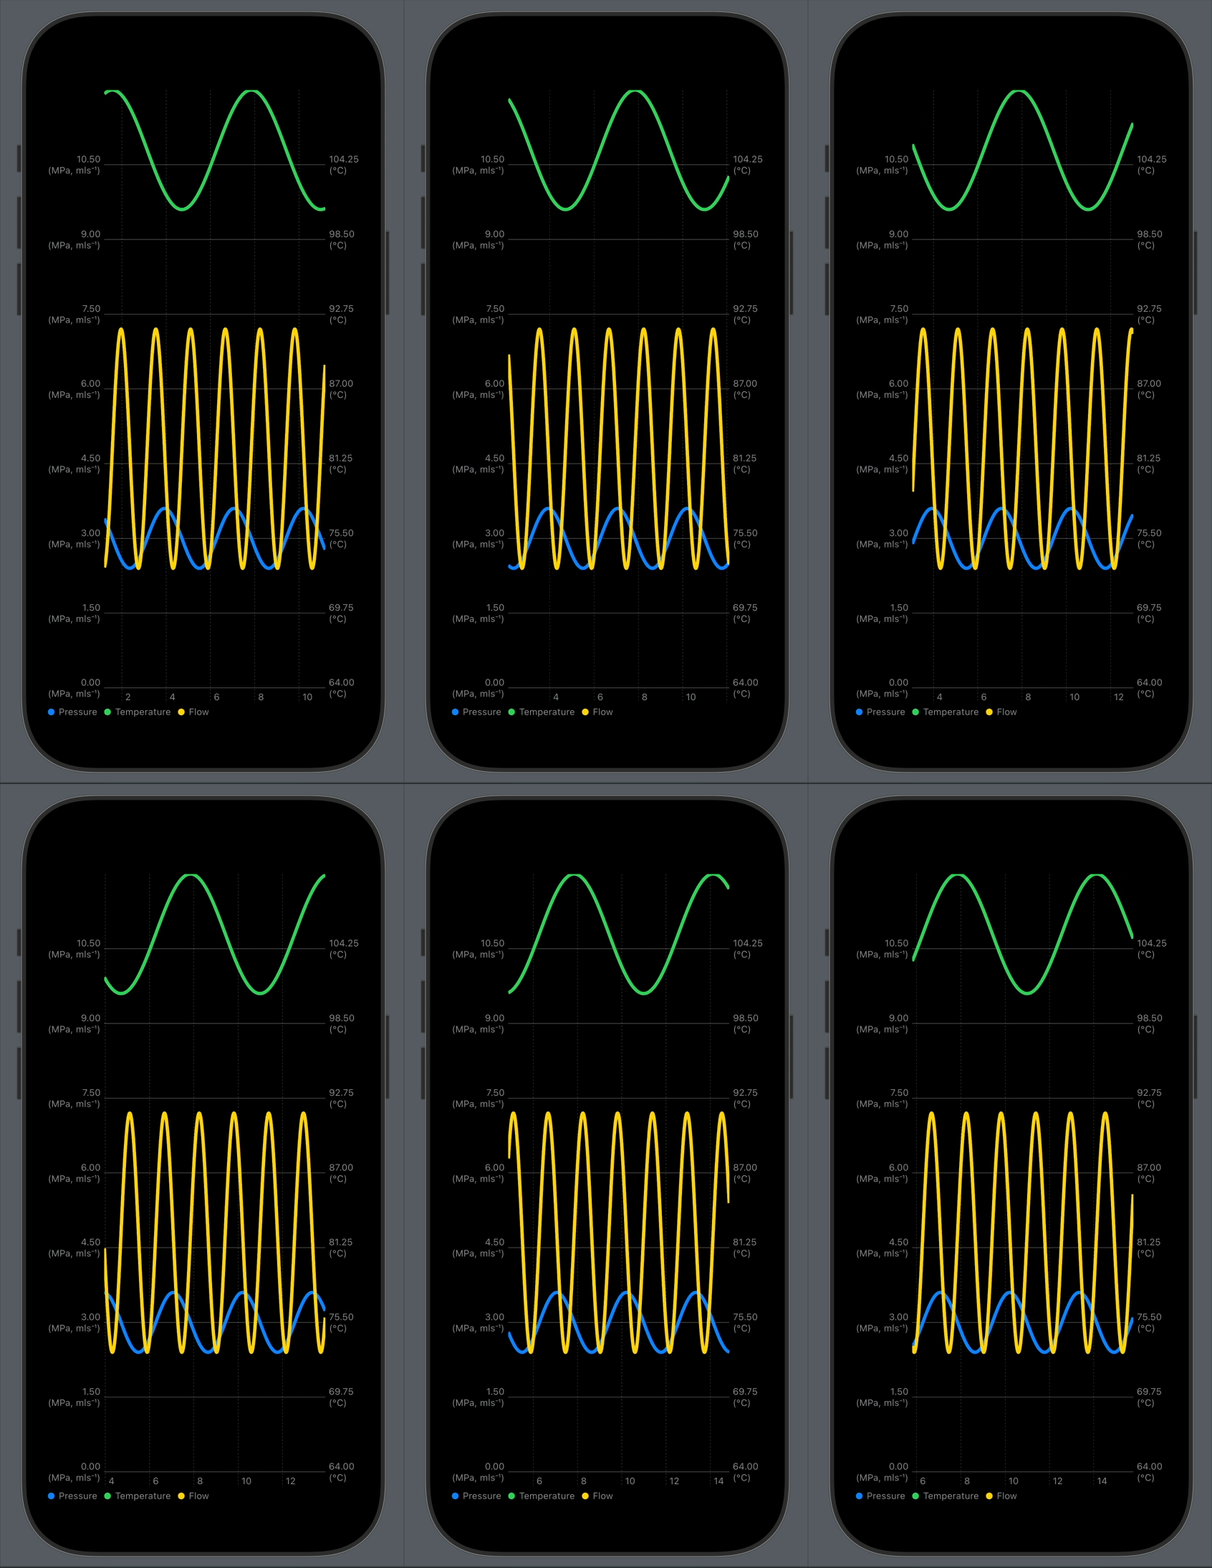
- Brew Graph
- Swift UI Charts
- Performance Issues
- Canvas Drawing
- Brew Profiles
- Saving / Loading
- Profile Editor
- Swift Data
TLDR
- Swift UI
- BLE
- Connecting Devices
- Managing Connection State
- Characteristics (Temp, Pressure, ...)
- Transferring Profiles
- Protobuf
- Brew Graph
- Swift UI Charts
- Performance Issues
- Canvas Drawing
- Brew Profiles
- Saving / Loading
- Profile Editor
- Swift Data